Showing posts with label janis nicolay. Show all posts

A Day at the Beach with Gallant & Jones

Contributor post by Janis of Pinecone Camp


Hi all! Janis here, from Pinecone Camp. I had the opportunity to shoot, once again, with the talented women behind Gallant & Jones. The two of them design and build, a line of beautiful beach and garden chairs as well as camp stools and trays. I'm the proud owner of a few of their chairs and stools and I love them! So comfortable, and perfect in the back yard with a g&t. ;)

Our shoot took place at a Vancouver beach and the nearby park. The day was a bit cool, but the lighting was pretty. We had two fabulous "models", Tanis, owner of the fabulous Bao Bei, and Elisa from appleturnover-homemade stories. 


Nothing like a picnic shoot, where you can actually eat and drink the props! Wish all my shoots were like that. Sigh.

Have a great day!
janis

................................................

An interiors and lifestyle photographer (and closet baker by night), Janis Nicolay hails from Vancouver and adores travel, airports, road trips, camping and mid-century style.  Check out her new recipe cards and beautiful photo's on etsy.

Blog: pineconecamp.blogspot.com
Site: janisnicolay.com


A Walk on the Wild Side

Hi everyone! Janis here, from Pinecone Camp. With a few long weekends coming up in the next couple of months, I thought I'd share a magical place with you, located on the wild west side of Vancouver Island. Cougar Annie's Garden, near Tofino BC. Have you been to this part of Canada? It's a pretty spectacular place. I had the opportunity to shoot Cougar Annie's garden, with Erin Mclaughlin (editor of Style at Home and Canadian Gardening), and a writer, Masa Takei, a while back. I have to admit, I'm a city girl, but I absolutely loved hanging out here. The story of Cougar Annie is fantastic too. She settled here in 1915, had 11 kids, many husbands, and had to kill several cougars. A fascinating woman. You can read more here, but I'll fill in a few bits through the post.

This was our float plane that would take us to Hesquiat Penisula Provinical Park, where Cougar Annie's garden is located. It was just before 5am, best light of the day for shooting a garden. Only a 12 minute flight to our destination so all was looking good.

Looking down on Cougar Annie's garden from the plane. Incredible view.

No one was there to meet us, so we had to find the garden ourselves. I have no sense of direction, so I was happy that Erin is a human compass. After a 3 km walk, and noticing some large animal tracks, we finally found it! Erin is the one in awe, on the right.

The entire place is one huge moss carpet. Looks and smells beautiful and it's fantastic to walk on.

Beautiful lupin, and some remnants from the past.

The original house is crumbling. Cougar Annie operated a general store and a post office out of her home. Her main business was her nursery, and she shipped plants all over Canada.

Natural paths, moss all over the trees, and a stunning variety of plant life. If anyone knows what the plant is, bottom right, I'd love to know. I had been told it was something like a "venus flytrap". Really?

I know many of you have heard of, or been to, Tofino, maybe even did a little surfing, but if you get the chance, you really should check this place out. I think a visit to Tofino, and a trip to Cougar Annie's would make a perfect long weekend!

..........................................................................

An interiors and lifestyle photographer (and closet baker by night), Janis Nicolay hails from Vancouver and adores travel, airports, road trips, camping and mid-century style.

Blog: pineconecamp.blogspot.com
Site: janisnicolay.com

DIY: Wire Waste Basket Turned Pendant Light

Contributor post by Janis Nicolay of Pinecone Camp


Hi Everyone! Janis here, from Pinecone Camp. I mentioned on my blog, a couple of weeks ago, that I had found a $2 wire waste basket, and I was going to turn it into a pendant light. Well here it is. I used scrapes of fabric to create a light for my niece. Simple and really inexpensive!  

I picked up a "hemma" cord set from Ikea to attach to my $2 basket.

Next step was to snip out a space to feed the cord through.


Cut strips of fabric to weave and wrap around basket.


Weave fabric strip through basket about every 6 inches.

A happy light for a niece that doesn't like really dark rooms. ;)
Gives of a pinky glow and some pretty shadows. That should scare away any monsters.


So great to contribute to one of my favourite blogs! Thanks Jan. Have a great day everyone!

..........................................................................

An interiors and lifestyle photographer (and closet baker by night), Janis Nicolay hails from Vancouver and adores travel, airports, road trips, camping and mid-century style.

Blog: pineconecamp.blogspot.com
Site: janisnicolay.com
Shop: PineconeCamp.etsy.com

DIY: Easter Place Cards

Contributor post and photos by Janis Nicolay of Pinecone Camp


Hello all! Janis here, from Pinecone Camp. I'm hosting my family's Easter brunch this year, so I've made some origami "place cards" for everyone. Really easy to do and they look pretty cute too. I made rabbit sugar cookies to place inside each pocket. I figure most of you have your own cookie recipe but, if you don't, just let me know and I'll post mine. Update: Janis has posted the recipe on her blog which you can find at the bottom of this post here.


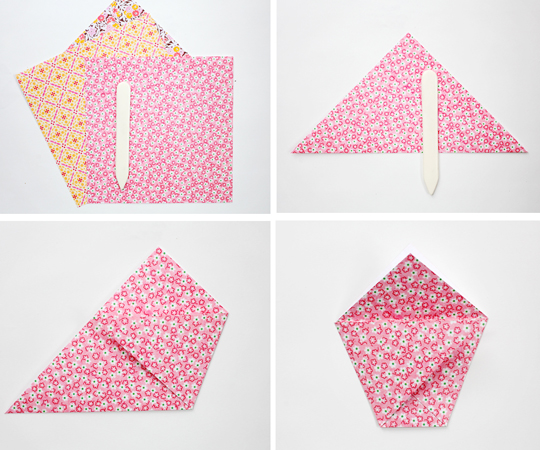
I scanned three different fabrics, then printed them on a heavier stock paper. Each piece was cut to 8"x8". You can use any type of paper you like, as long as it's square.


Stamp or print names on front flap of pocket.


Last but not least, eat your place card.

Happy Easter!

..........................................................................

An interiors and lifestyle photographer (and closet baker by night), Janis Nicolay hails from Vancouver and adores travel, airports, road trips, camping and mid-century style.

Blog: pineconecamp.blogspot.com
Site: janisnicolay.com
Shop: PineconeCamp.etsy.com

D.I.Y. Kokeshi Display

Contributor post by Janis Nicoay of Pinecone Camp


Hi Everyone! Janis here, from Pinecone Camp. Thought I'd share a pretty simple d.i.y. that I did for a li collection of vintage Kokeshi that I've had for years.

I had started out with wanting to display 6 kokeshi, but one had an unfortunate accident. I snapped her head off. Too hard to glue at this time ;) I decided on the sizes of boxes I wanted, and measured out the pieces on a scrap of plywood.


Since I didn't want this to be too labour intensive (my mind starts to wander at a certain point), I just used wood glue to assemble. After gluing, I snapped on some rubber bands to keep it all together while drying.


I cut the fabric to fit the bottom of the box then, using a little spray glue, attached it to a piece of card board. I wanted it to be easy to switch up back drops, if I decide to display something else....like my collection of deer. You can easily pop out the back drop this way.


That's it! I've got a few more to unpack, so I just may add to this wall.
My Zimbio
Top Stories My Ping in TotalPing.com